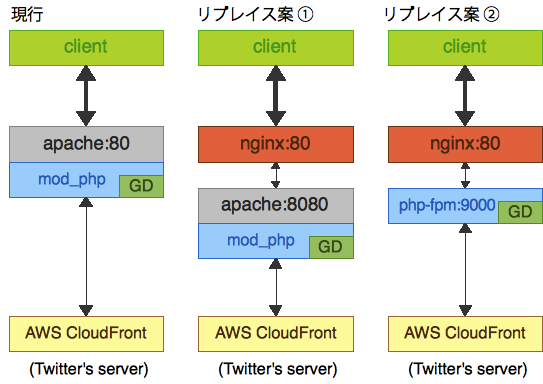
yubitterという携帯向けTwitterクライアントサービスで、ユーザーのアイコンを携帯電話向けに変換している(※1)、いわゆる画像変換サーバーのhttpd部分をApacheからnginxへ変更しました。
処理は単純に以下の流れです。
- クライアントからアイコン画像のリクエストが来る
- 既にハードディスクにキャッシュファイルがある場合は、それをそのまま返す
- ファイルがない場合は、PHPプログラムがアイコン画像がアップロードされているTwitterのサーバー(現在はAmazon S3/CloudFront)へ取りに行く
- PHPプログラムが取得した画像データをGDライブラリを利用して加工、ハードディスクに保存、レスポンスを返す
変換するにあたり、以下の2パターンを検討しました。
リプレイス案1は、Apacheのレイヤーを一つ下げてAPサーバーに専念してもらう案で、2案は、Apache+mod_phpの構成をやめて、php-fpm(FastCGI)に置き換える案です。
厳密にテストをしたかったのですが、時間が取れなかったのでどこかにベンチマークがないものかとGoogleで探してみたところ、
Apache + mod_php compared to Nginx + php-fpm
このブログを見つけました。
このデータからわかるのは、同時アクセス時のリクエスト処理数はApache+mod_php(-kはKeepAliveのこと)の方が優れているということで、実際には処理速度とメモリの消費量という観点でmod_php v.s. php-fpmを計測するべきだと思います。
今回は、上記のデータとリプレイスが簡単で影響が少ないということで、1案で対応しました。時間があれば、Apache + mod_php v.s nginx + php-fpmのベンチマークをやりたいと思います。
まず、nginxをインストールします。
#nginxのコンパイルに必要なもの
sudo yum install pcre-devel.x86_64
sudo yum install openssl-devel.x86_64

#stableの最新版を公式サイトから取得
wget http://www.nginx.org/download/nginx-0.7.67.tar.gz
tar vfxz nginx-0.7.67.tar.gz
cd nginx-0.7.67

#監視用のステータス取得モジュールオプションを付ける
./configure --with-http_stub_status_module
make
sudo make install
標準では/usr/local/nginx にインスールされます。
設定ファイルを修正します。
sudo vi /usr/local/nginx/conf/nginx.conf
user  apache apache;
worker_processes  2;

error_log  logs/error.log;
pid        logs/nginx.pid;

events {
    worker_connections  1024;
}

http {
    include       mime.types;
    default_type  application/octet-stream;

    log_format  main  '$remote_addr - $remote_user [$time_local] "$request" '
                      '$status $body_bytes_sent "$http_referer" '
                      '"$http_user_agent" "$http_x_forwarded_for"';

    access_log  logs/access.log  main;

    sendfile    on;
    tcp_nopush  on;
    tcp_nodelay on;
    keepalive_timeout  10;
    server_tokens off;
    ignore_invalid_headers on;
    connection_pool_size 256;
    client_header_buffer_size 1k;
    large_client_header_buffers 4 2k;
    request_pool_size 4k;

    server {
        listen       80;
        server_name  localhost;

        location / {
            access_log off;
            return 403;
        }

        location /server-status {
            proxy_pass http://localhost:8080;
            access_log off;
            allow 127.0.0.1;
            deny all;
        }

        location /nginx_status {
            stub_status on;
            access_log off;
            allow 127.0.0.1;
            deny all;
        }

        # redirect server error pages to the static page /50x.html
        #
        error_page   500 502 503 504  /50x.html;
        location = /50x.html {
            root   html;
        }
    }

    include /usr/local/nginx/conf/example.jp.conf;
}
includeするバーチャルホストの設定ファイルを作成します。
sudo vi /usr/local/nginx/conf/example.jp.conf
proxy_redirect                          off;
proxy_set_header Host                   $host;
proxy_set_header X-Real-IP              $remote_addr;
proxy_set_header X-Forwarded-Host       $host;
proxy_set_header X-Forwarded-Server     $host;
proxy_set_header X-Forwarded-For        $proxy_add_x_forwarded_for;

server {
    listen       80;
    server_name  example.jp;
    root /var/www/example.jp/public_html;

    location / {
        if (-f $request_filename) {
            access_log off;
            expires 30d;
            break;
        }

        if (!-f $request_filename) {
            proxy_pass http://localhost:8080;
            access_log off;
            break;
        }
    }

    location ~ \.php {
            proxy_pass http://localhost:8080;
            break;
    }
}
Linux用の起動スクリプトを作成します。
sudo vi /etc/init.d/nginx
#!/bin/sh
#
# nginx - this script starts and stops the nginx daemin
#
# chkconfig:   - 85 15
# description:  Nginx is an HTTP(S) server, HTTP(S) reverse \
#               proxy and IMAP/POP3 proxy server
# processname: nginx
# Source function library.
. /etc/rc.d/init.d/functions

# Source networking configuration.
. /etc/sysconfig/network

# Check that networking is up.
[ "$NETWORKING" = "no" ] && exit 0

nginx="/usr/local/nginx/sbin/nginx"
prog=$(basename $nginx)

NGINX_CONF_FILE="/usr/local/nginx/conf/nginx.conf"

lockfile=/var/lock/subsys/nginx

start() {
    [ -x $nginx ] || exit 5
    [ -f $NGINX_CONF_FILE ] || exit 6
    echo -n $"Starting $prog: "
    daemon $nginx -c $NGINX_CONF_FILE
    retval=$?
    echo
    [ $retval -eq 0 ] && touch $lockfile
    return $retval
}

stop() {
    echo -n $"Stopping $prog: "
    killproc $prog
    retval=$?
    echo
    [ $retval -eq 0 ] && rm -f $lockfile
    return $retval
}

restart() {
    configtest || return $?
    stop
    start
}

reload() {
    configtest || return $?
    echo -n $"Reloading $prog: "
    killproc $nginx -HUP
    RETVAL=$?
    echo
}

force_reload() {
    restart
}

configtest() {
  $nginx -t -c $NGINX_CONF_FILE
}

rh_status() {
    status $prog
}

rh_status_q() {
    rh_status >/dev/null 2>&1
}

case "$1" in
    start)
        rh_status_q && exit 0
        $1
        ;;
    stop)
        rh_status_q || exit 0
        $1
        ;;
    restart|configtest)
        $1
        ;;
    reload)
        rh_status_q || exit 7
        $1
        ;;
    force-reload)
        force_reload
        ;;
    status)
        rh_status
        ;;
    condrestart|try-restart)
        rh_status_q || exit 0
	    ;;
    *)
        echo $"Usage: $0 {start|stop|status|restart|condrestart|try-restart|reload|force-reload|configtest}"
        exit 2
esac
起動スクリプトに実行パーミッションをつける
sudo chmod +x /etc/init.d/nginx
キャッシュファイルのパーミッションの関係があるので、起動ユーザーはapacheに合わせておきます。
特定ドメイン以外のアクセスは全て403を返すようにして、localhostからのステータス取得アクセスのみ許可します。ドキュメントルートにキャッシュファイルが存在する場合は、expiredヘッダーを付けて、nginxが返します。ファイルが存在しない場合や、拡張子が.phpのものはApacheに渡し、処理内容を返してもらいます。
Apache側はListenを8080ポートに変えます。Apacheはプロキシを介してアクセスされるので、クライアントのIPアドレスが取得できません。Apacheでも取得したい場合は、mod_rpafなどでX-Real-IPを変換する必要があります。
通常はgzip圧縮設定などもしますが、今回の用途では圧縮済みのjpgファイルのみのやりとりとなるので、設定を省いています。
nginxの詳しい説明は公式 非公式のWiki(日本語)が分かりやすいと思います。
次回は、リプレイス後のパフォーマンスの違いを書きます。
→nginxがApacheよりも優れていることが一目瞭然のグラフ


えーーーーっ!?
Apache + mod_php から nginx + php5-fpm にリプレースしようと四苦八苦している最中だというのに・・・!!
現在はnginxのバージョンも上がっていますし、nginxが逆転してるとか、ないですかね。
心が折れそうです><;
[…] 越しの IP アクセス制御 with mod_extract_forwarded 編 – にぽたん研究所 via. Apacheをnginxにリプレイスした | cloudrop via. […]
[…] 前回のリプレイスでどのくらい変化があるかを調べてみました。構成などはそちらをご覧ください。 […]